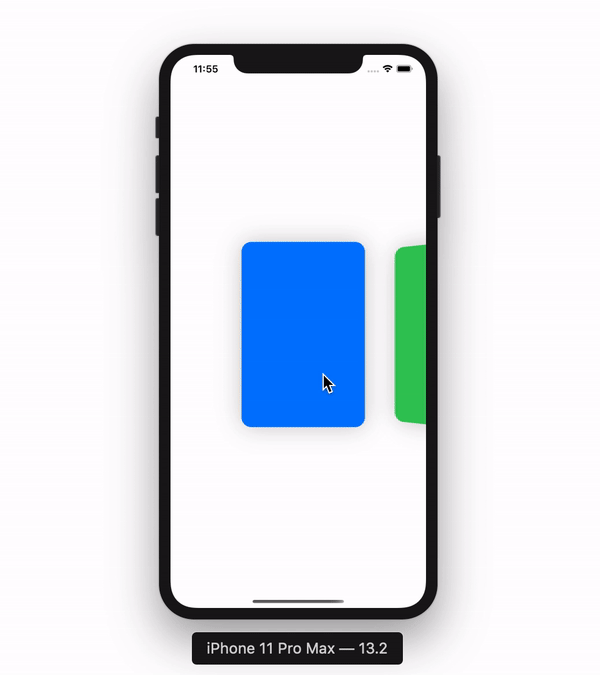
我们预览下今天要实现的 3D scroll 效果。学完本教程后,你就可以在你的 App 中把这种 3D 效果加入任何自定义的 SwiftUI 视图。下面我们来开始本教程的学习。
入门
首先,创建一个新的 SwiftUI 视图。为了举例说明,在这个新视图中,我会展示一个有各种颜色的矩形列表,并把新视图命名为 ColorList。
1
2
3
4
5
6
7
8
9
10
11
12
13
import SwiftUI

struct ColorList: View {
    var body: some View {
        Text("Hello, World!")
    }
}

struct ColorList_Previews: PreviewProvider {
    static var previews: some View {
        ColorList()
    }
}
颜色数据
在视图的结构体里,添加一个用于记录颜色的变量。
1
var colors: [Colors]
实现这个列表
在 body 变量的内部,删除掉占位 Text。在 ScrollView 嵌套中添加一个 HStack,如下:
1
2
3
4
5
6
7
var body: some View {
    ScrollView(.horizontal, showsIndicators: false) {
        HStack(alignment: .center, spacing: 50) {

        }
    }
}
展示矩形
我们使用 ForEach 在 HStack 内部根据 colors 中的数据分别创建不同颜色的矩形。此外,我修改了矩形的 frame,让它看起来与传统 UI 布局更像一些。
1
2
3
4
5
6
7
8
9
10
11
var body: some View {
    ScrollView(.horizontal, showsIndicators: false) {
        HStack(alignment: .center, spacing: 20) {
            ForEach(colors, id: \.self) { color in
                Rectangle()
                    .foregroundColor(color)
                    .frame(width: 200, height: 300, alignment: .center)
            }
        }
    }
}
在 Preview 结构体中传入如下的颜色参数:
1
2
3
4
5
struct ColorList_Previews: PreviewProvider {
    static var previews: some View {
        ColorList(colors: [.blue, .green, .orange, .red, .gray, .pink, .yellow])
    }
}
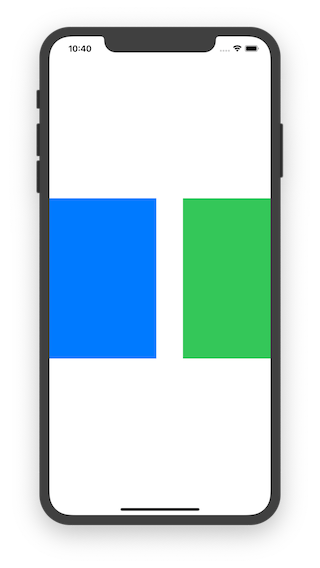
你可以看到下图中的效果:
增加 3D 效果
首先,把 Rectangle 嵌套在 GeometryReader 中。这样的话,当 Rectangle 在屏幕上移动的时候,我们就可以获得其 frame 的引用。
1
2
3
4
5
6
7
8
9
10
11
12
13
var body: some View {
    ScrollView(.horizontal, showsIndicators: false) {
        HStack(alignment: .center, spacing: 230) {
            ForEach(colors, id: \.self) { color in
                GeometryReader { geometry in
                    Rectangle()
                        .foregroundColor(color)
                        .frame(width: 200, height: 300, alignment: .center)
                }
            }
        }
    }
}
根据 GeometryReader 的用法要求,我们需要修改上面定义的 HStack 的 spacing 属性。
在 Rectangle 中加入下面这行代码。
1
.rotation3DEffect(Angle(degrees: (Double(geometry.frame(in: .global).minX) - 210) / -20), axis: (x: 0, y: 1.0, z: 0))
当 Rectangle 在屏幕上移动时,这个方法的 Angle 参数会发生改变。请重点看 .frame(in:) 这个函数,你可以获取 Rectangle 的 CGRect 属性 minX 变量来计算角度。
axis 参数是一个元组类型,它定义了在使用你传入的角度参数时,哪一个坐标轴要发生改变。在本例中,是 Y 轴。
rotation3DEffect() 方法的文档可以在苹果官方网站的 这里 找到。
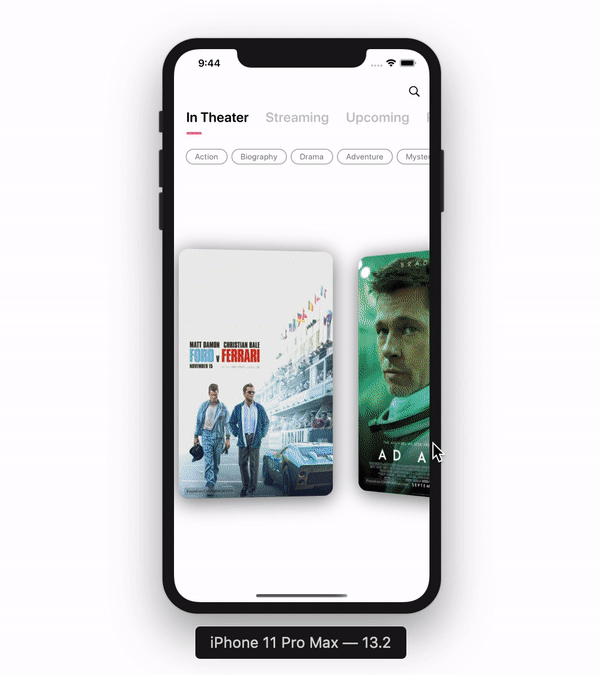
下一步,把这个案例跑起来。当矩形在屏幕上移动时,你可以看到它们在旋转。
修改矩形的 cornerRadius 属性,并加上了投影效果,让它更美观。
1
2
3
4
5
6
7
8
9
10
11
12
13
14
15
16
17
18
19
20
21
struct ColorList: View {

    var colors:[Color]

    var body: some View {
        ScrollView(.horizontal, showsIndicators: false) {
            HStack(alignment: .center, spacing: 230) {
                ForEach(colors, id: \.self) { color in
                    GeometryReader { geometry in
                        Rectangle()
                            .foregroundColor(color)
                            .frame(width: 200, height: 300, alignment: .center)
                            .cornerRadius(16)
                            .shadow(color: Color.black.opacity(0.2), radius: 20, x: 0, y: 0)
                            .rotation3DEffect(Angle(degrees: (Double(geometry.frame(in: .global).minX) - 210) / -20), axis: (x: 0, y: 1.0, z: 0))
                    }
                }
            }.padding(.horizontal, 210)
        }
    }
}
最终效果